Friday, October 15, 2010

Chocolate Covered Marshmallow Cookies

This is a cookie from my youth, either in this shape or in the pinwheel shape, which were my particular favorites.  I found this recipe in the September 2010 issue of Martha Stewart's Everday Food magazine and just knew I had to try them.  This is not a recipe if your goal is to whip out a batch of cookies in a hurry.  These took some time but were totally worth the effort.  The recipe states it makes 18, but I only managed to get ten out of the dough and had only enough chocolate, even after adding three more ounces, to coat nine cookies.  Oh well, nine cookies are better than none!!

Chocolate Covered Marshmallow Cookies
(as adapted from Everyday Living Magazine)

1/4 cup plus 2 tablespoons all-purpose flour, plus more for working
1/4 cup plus 2 tablespoons whole-wheat flour
1/4 teaspoon coarse salt
1/4 teaspoon baking soda
1/4 teaspoon baking powder
1/4 teaspoon ground cinnamon
3 tablespoons unsalted butter, room temperature
3 tablespoons packed light-brown sugar
1 large egg
9 large marshmallows, halved
9 ounces semisweet chocolate, coarsely chopped
Preheat oven to 350 degrees, with racks in upper and lower thirds. In a medium bowl, whisk together flours, salt, baking soda, baking powder, and cinnamon. In a large bowl, using an electric mixer, beat butter and brown sugar on high, scraping down bowl as needed, until light, 4 minutes. Add egg and beat to combine, scraping down bowl as needed. With mixer on low, gradually add flour mixture and beat until combined.
Drop dough by tablespoonfuls, 3 inches apart, onto two parchment-lined baking sheets. With the bottom of a measuring cup dipped in flour, flatten cookies to 2 inches in diameter. Bake until dry and set, about 7 minutes, rotating sheets halfway through. Remove from oven and top each cookie with a marshmallow half. Bake until marshmallows are soft, 2 minutes.
Remove from oven and, with a metal spatula sprayed with vegetable spray, gently flatten each marshmallow. Let cookies cool completely on sheets on wire racks.
Place chocolate in a medium heatproof bowl and microwave in 30 minute increments, stirring often, until chocolate is thoroughly melted. Place one cookie at a time on tines of a fork, submerge in chocolate, then tap fork on edge of bowl to remove excess. Place on wire rack set over a baking sheet. Let cookies set in refrigerator, about 10 minutes.

Friday, October 8, 2010

Mom's Clam Dip

This blog entry is in honor of my mother's clam dip.  It is a family tradition.  There isn't a family gathering that goes by where this isn't served by someone.  Sometimes the simplest of food items can evoke such strong memories and for me, this is one of those items. 

Growing up, my parents use to throw parties in our remodeled basement which was where it was "happening."  There was a bona fide bar with three built in bar stools that were ever so fun to spin around on. There were two large mirrors on the walls.   There was a red linoleum tile floor, a couch, chairs and a piano.  Eventually it was additionally decorated to resemble an English pub, with English beer glasses, a map of the Underground and various other souvenirs my parents collected on their travels to England.

Well, back to the clam dip.  The day after these parties I would go down to explore the aftermath where it smelled of stale beer and cigarette smoke (weren't the '60s something) and inevitably there would be left over chips and clam dip sitting around.  Not for long!  Nothing better than slightly soggy potato chips and clam dip which has been out all night. 

We're all grown up now and I wanted to make sure I got this recipe (I use the term lightly as I don't believe there is a recipe) written so it can be passed on to the next generation.  Like my grandmother's English tarts, my mother's clam dip is and shall remain a family tradition.

Mom's Clam Dip

1 8oz package cream cheese at room temperature
1/2 tsp. garlic powder
2 Tbsp. mayonnaise
1 can chopped clams, undrained

Beat cream cheese, garlic powder, mayonnaise and approximately 2/3 of the clam juice until smooth and creamy.  Drain clams of remaining juice.  Add clams to cream cheese mixture and stir until blended.  Serve with chopped veggies and potato chips.

This is my take on this concoction.  I'm sure my two sisters have their own variations, but the basics would be the same.

Monday, October 4, 2010

Lunch At The Coast

The Husband and I took off one recent beautiful, sunny Fall Saturday and drove to Newport on the Oregon coast for a walk around downtown and lunch at Mo's.  You Oregonians will be familiar with Mo's delicious clam chowder. 
It's worth the drive just for a cup, along with their yummy cheesy garlic bread.  The day was perfect and it was a fantastic, much needed get-away.

Wednesday, September 29, 2010

Homemade Cannelloni

Here is a divine recipe for that special occasion when you have a lot of time for cooking and you want to make an impressive, delicious dish for a crowd.  The beauty of this recipe is that all of the components can be made in advance, the dish can even be assembled the day before one's dinner and the last minute kitchen preparation time is avoided. 

If there is one thing I can't stand about entertaining, it's being stuck in the kitchen slaving over the oven while my guests are all having fun without me.  I often look for recipes just like this one that can be done ahead of time when I am going to entertain a group.  An unstressed hostess is a good hostess!

This is such a sublime dish.  The crepe "noodles" are the most delicate of creations.  I suppose those no-bake lasagna noodles could be cooked up in a pinch and used as a substitute but oh, they just wouldn't have the consistency that these had.  It's a great recipe for the vegetarians in the crowd too.  Be sure and let this sit after taking out of the oven for at least 15 minutes before cutting into it so the cheeses congeal a little bit before serving.

Homemade Cannelloni

For sauce

3 tablespoons olive oil
1 medium onion, chopped
3 garlic cloves, minced
2 (28- to 32-oz) cans Italian tomatoes in juice, drained, reserving juice, and finely chopped
1/2 cup water
1 teaspoon sugar
1 teaspoon salt
1/4 cup chopped fresh basil

For crêpes
3 large eggs
1 1/2 cups water
1 1/4 cups all-purpose flour
1/2 teaspoon salt
1 tablespoon unsalted butter, melted

For filling
2 lb fresh ricotta (3 cups)
2 large eggs
1 oz finely grated Parmigiano-Reggiano (1/2 cup)
1/3 cup chopped fresh parsley
1/2 teaspoon salt
1/2 teaspoon black pepper
1/2 lb fresh mozzarella  (I used small, fresh mozzarella balls)

Special equipment: 2 glass or ceramic baking dishes, one 13 by 9 inches and one 8 inches square

Make sauce:
Heat oil in a 5- to 6-quart heavy pot over moderately high heat until hot but not smoking, then sauté onion, stirring occasionally, until golden, about 6 minutes. Add garlic and sauté, stirring, until golden, about 1 minute. Add tomatoes with juice, water, sugar, and salt and simmer, uncovered, stirring occasionally, until thickened, about 30 minutes. Stir in basil and remove from heat.

Make crêpes:
Break up eggs with a wooden spoon in a medium bowl and stir in water until combined (don't beat). Sift in flour and salt, then stir batter until just combined. Force through a medium-mesh sieve into another bowl.

Lightly brush an 8-inch nonstick skillet with melted butter and heat over moderate heat until hot. Ladle about 1/4 cup batter into skillet, tilting and rotating skillet to coat bottom, then pour excess batter back into bowl. (If batter sets before skillet is coated, reduce heat slightly for next crêpe.) Cook until underside is just set and lightly browned, about 30 seconds, then invert crêpe onto a clean kitchen towel to cool completely. Make at least 11 more crêpes in same manner, brushing skillet with butter as needed and stacking crêpes in 3 piles.

Make filling and assemble cannelloni:
Stir together ricotta, eggs, Parmigiano-Reggiano, parsley, salt, and pepper.

Put oven rack in middle position and preheat oven to 425°F.

Cut mozzarella lengthwise into 1/4-inch-thick sticks.

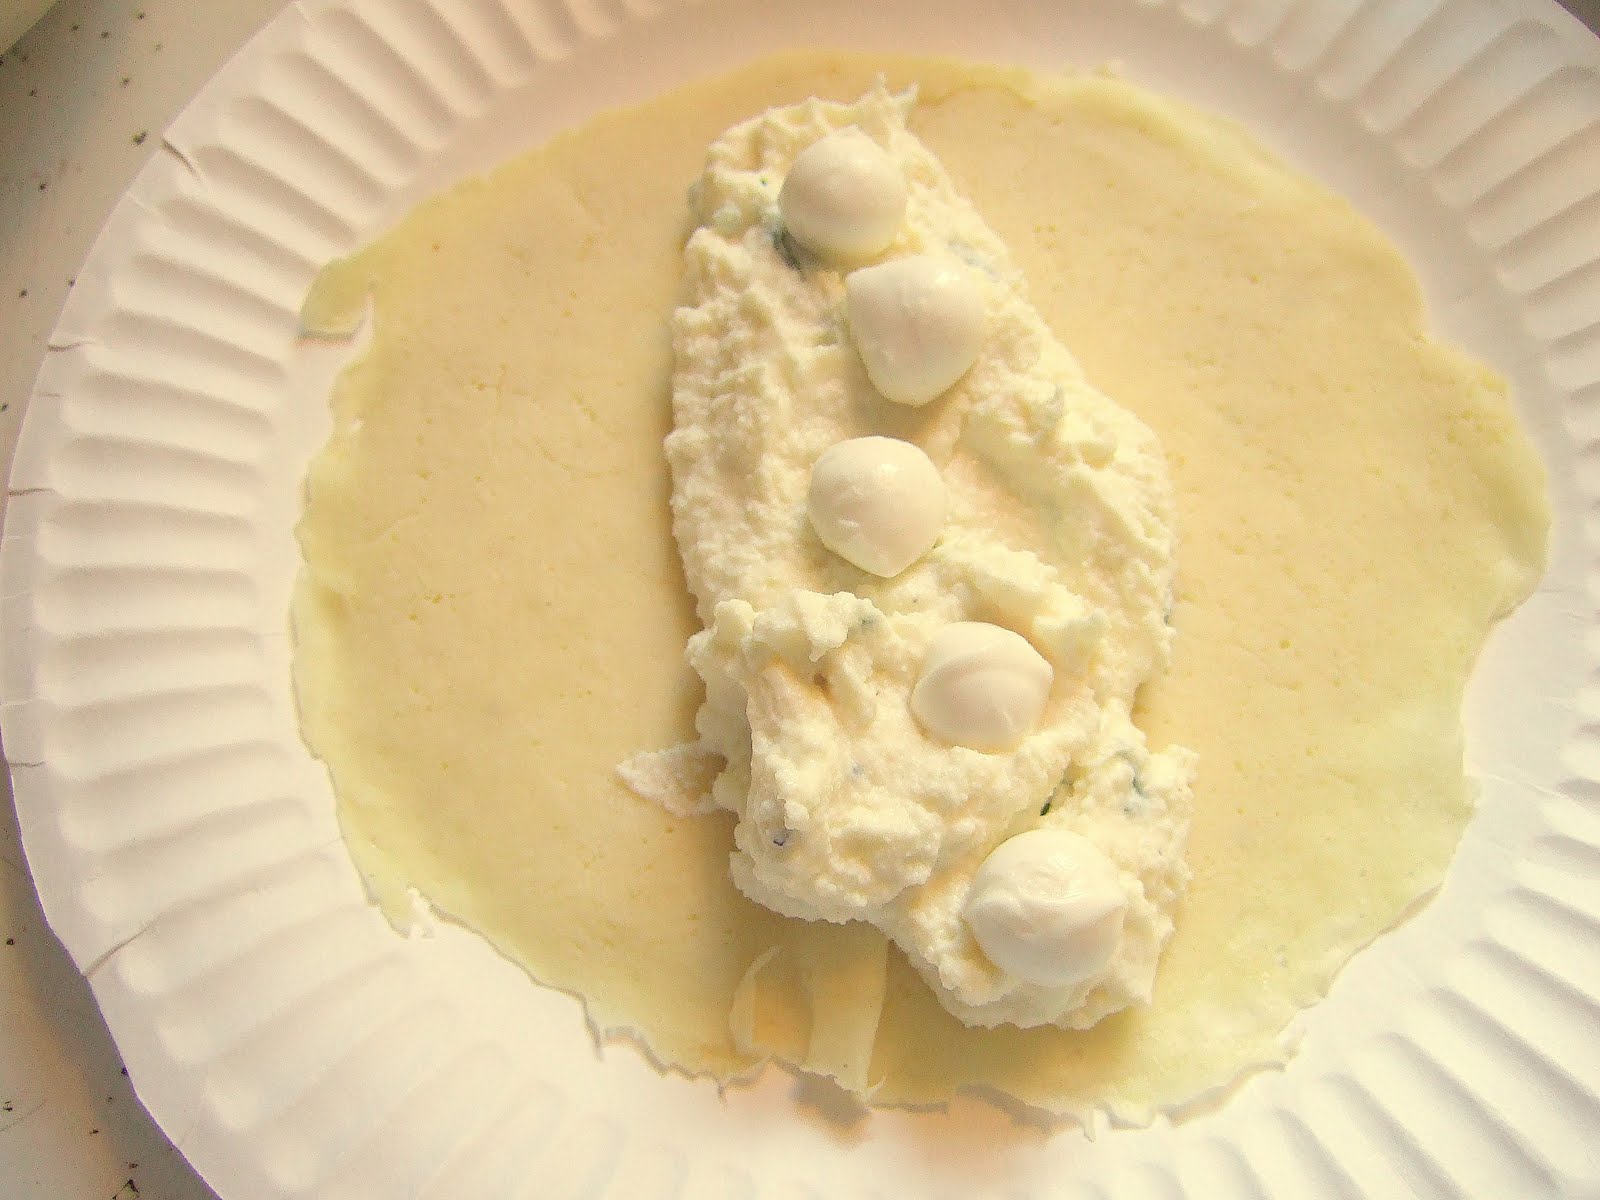
Spread 2 cups sauce in larger baking dish and 1 cup in smaller one. Arrange 1 crêpe, browned side up, on a work surface, then spread about 1/4 cup filling in a line across center and top with a mozzarella strip. Fold in sides to enclose filling, leaving ends open, and transfer, seam side down, to either baking dish. Fill 11 more crêpes in same manner, arranging snugly in 1 layer in both dishes (8 in larger dish and 4 in smaller).
Spread 1 cup sauce over cannelloni in larger dish and 1/2 cup in smaller dish. Tightly cover dishes with foil and bake until sauce is bubbling and filling is hot, 15 to 20 minutes. Serve remaining sauce on the side.
 
Cannelloni can be assembled (but not baked) 1 day ahead and chilled, covered with foil. Chill remaining sauce, covered, separately. Let stand at room temperature 15 minutes before baking, covered with foil. Reheat sauce, thinning slightly with water.

Wednesday, September 22, 2010

Roasted Tomatillo Salsa

Tired of the same old boring tomato salsa?  What you need to do is get a fabulous sister-in-law with a major green thumb who gives you a sack full of lovely tomatillos and a fresh green salsa is a food processor whirl away.  This is super easy to put together once everything is peeled and cooked.  There is no dicing or mincing involved.  Just chuck everything into the bowl of the processor and pulse a few times and it's done.
Serve with chips or as a topping for green enchiladas which is what I'll be doing with mine.  Thanks for all of the produce Christie.  You're the best!
Roasted Tomatillo Salsa

8-10 tomatillos, peeled and cut into halves
1-2 cloves of garlic
1/2 large onion, cut in quarters
3-4 green jalapeno peppers, seed if desired to avoid too much heat
1/2 cup cilantro

Preheat oven to 375 degrees and line a baking sheet with parchment paper.  Place tomatillo halves, garlic, onion and peppers on sheet and drizzle with a small amount of olive oil and sprinkle with salt and pepper.  Roast approximately 20-25 minutes.
Let mixture cool for a few minutes then place in food processor fitted with steel blade and add fresh cilantro leaves.  Pulse 5-6 times until it forms a smooth sauce.  You make need to add 1-2 tablespoons of water.  Serve as an accompaniment with corn chips or as a sauce for enchiladas or burritos.

Thursday, September 16, 2010

A Summer Salad

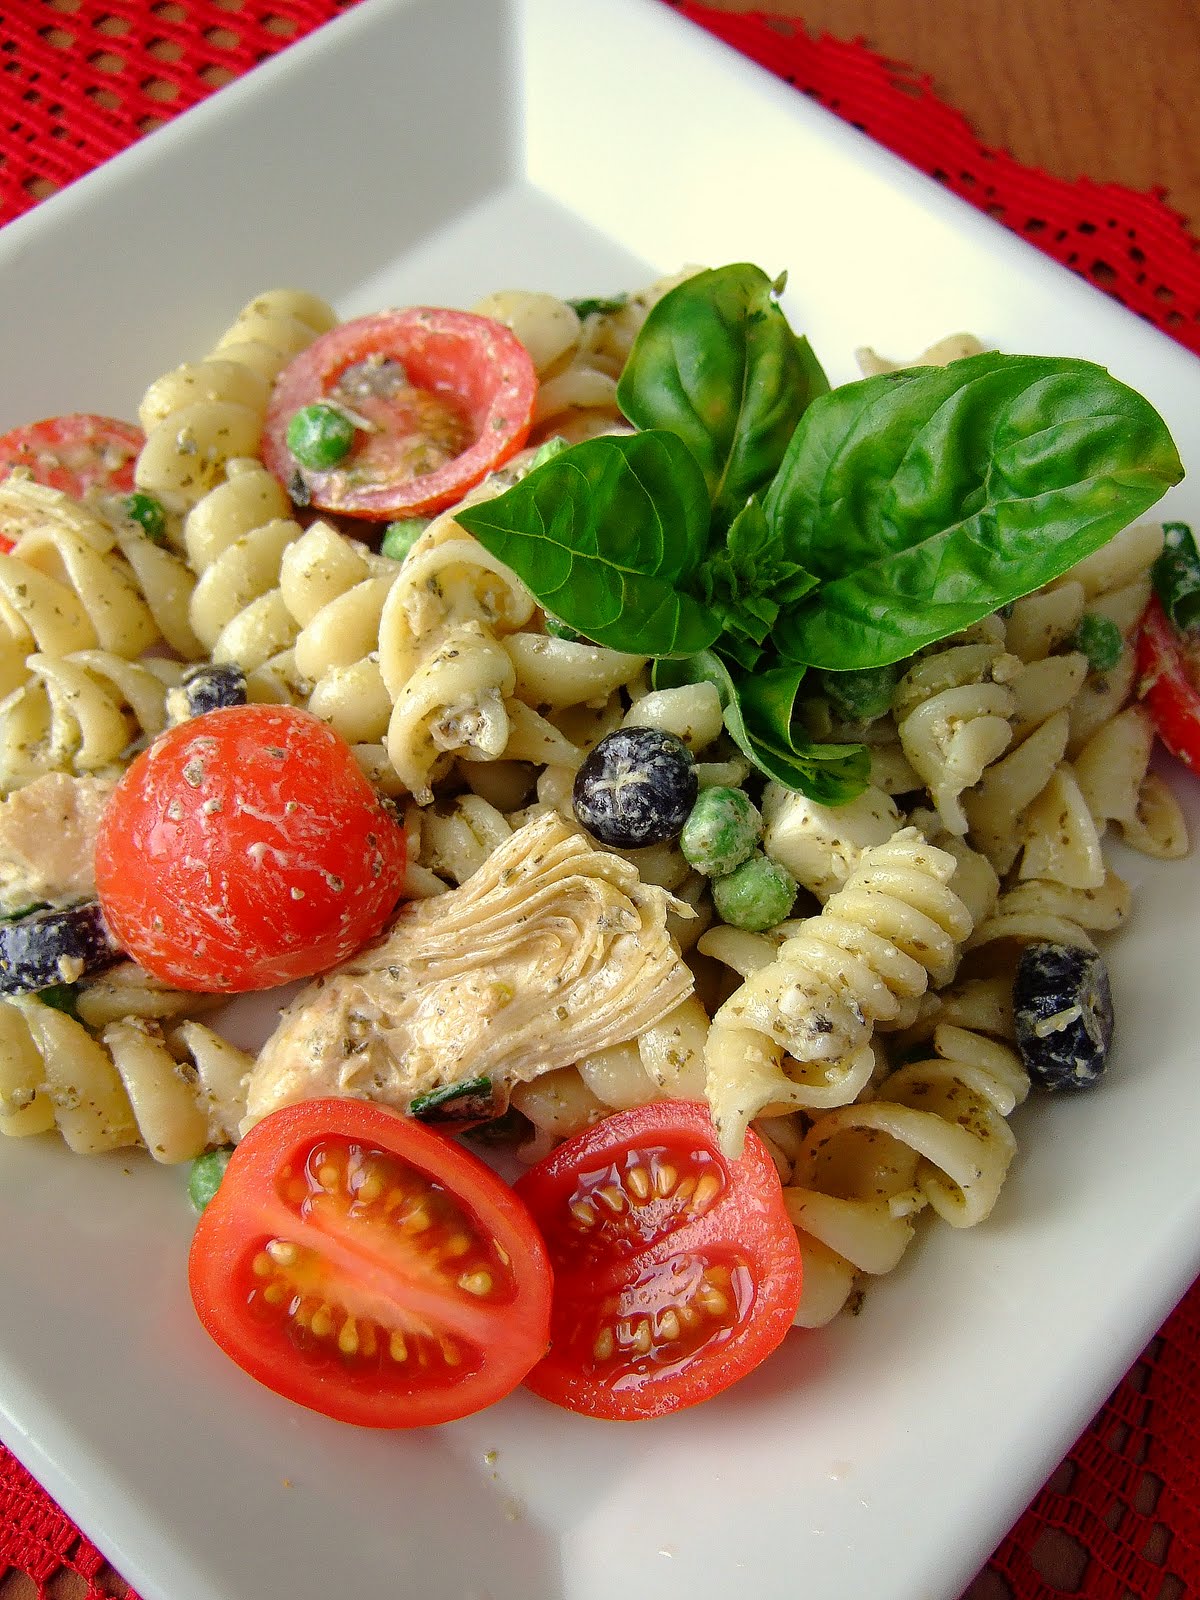
As mentioned previously, the poor garden is not fairing well this year due to our long, cold late spring/early summer and the tomatoes are yet to ripen.  I do have basil though, so pesto has been on my mind.  A cold pesto pasta salad screams of summer to me so I am not going to let the fact that there are no ripe tomatoes in the garden stop me.  Off to the store I go for some very nice tomatoes called Romanescas, a variety I had never heard of before.  They are a bit bigger than a cherry tomato and in a kind of oblong shape.  Perfect!

This is one of those recipes where I just clean out the cupboards, adding to the salad as my mood suits me and today this included 1 jar of marinated artichoke hearts, 1 small can of diced black olives, cubes of fresh mozzarella cheese, and some peas along with the pesto and some mayonnaise. It's the kind of non-recipe I love to make.
Pesto Pasta Salad

1/2 cup pesto, fresh or homemade  (My pesto recipe can be found here).
1/2 cup mayonnaise
1 lb. pasta (any shape you want but I like Rotini)
1/4 shredded Parmesan cheese
8 oz. chopped tomatoes
4 oz. fresh Mozzarella cheese, cut into small cubes
1 small jar drained marinated artichoke hearts
1 small can sliced black olives
3/4 cup frozen green peas
2 green onions, finely sliced
salt and pepper to taste

Bring to boil 5 quarts of salted water.  Add pasta and cook until al dente.  Drain and run under cold water until pasta is cooled.  In a small bowl, mix pesto, mayonnaise and Parmesan cheese together.  Add to pasta along with the rest of the ingredients and toss all until well mixed.  Add salt and pepper to taste.  Refrigerate until ready to serve.

Saturday, September 11, 2010

Salem Saturday Market 9/11/2010

The anniversary of September 11, 2001 always makes me somber and reflective of those horrid events that took place and how this country and world have evolved since.  This a.m. as the news channels were showing images of that dreadful day, I decided to go do something that would make me smile and that was to wander the aisles of the Salem Saturday Market on this beautiful late summer morning.  Enjoy the pictures and the sunshine.


Wednesday, September 8, 2010

Fall Garden Haiku

The corn unripened
Green stalks reach out for the sun
Fall comes too quickly

Sunday, September 5, 2010

Doughnuts In A Muffin

This recipe is dedicated to all my doughnut loving friends and family (you know who you are Warren and The Husband).  I like to think they're a wee bit healthier than the greasy, fried doughnut from the corner shop or grocery store, as they're baked.  And as the cook, let me tell you they were a heck of a lot easier to make.  I have attempted homemade doughnuts twice and after the second time, I vowed never to do it again.  It is messy, difficult and needless to say, greasy.

This recipe comes from King Arthur Flour, a really great site for recipes of all kinds.  So, if it's Sunday morning and you don't want to get out of your bathrobe and run out for doughnuts, just make some muffins instead.  And the good thing is, this recipe makes enough for leftovers!

Doughnut Muffins 
(makes 18 muffins)

For the Batter

1/4 cup butter
1/4 cup vegetable oil
1/2 cup granulated sugar
1/3 cup brown sugar
2 large eggs
1 1/2 teaspoons baking powder
1/4 teaspoon baking soda
3/4 to 1 ¼ teaspoons ground nutmeg, to taste
1 teaspoon cinnamon
3/4 teaspoon salt
1 teaspoon vanilla extract
2 2/3 cups all-purpose flour
1 cup milk

For the Toppings

Glaze (for six muffins)

1 1/2 tablespoons butter; melted
1/2 cup confectioners’ sugar; sifted
1/2 teaspoon vanilla
1 tablespoon hot water

Cinnamon Sugar Topping (for six muffins)

1 1/2 Tbsp butter; melted
1 Tsp cinnamon
2 Tbsp granulated sugar

Sugar Topping  (for six muffins)

1 1/2 Tbsp butter; melted
Sanding Sugar or Decorator Sugar

Directions
1) Preheat the oven to 425°F. Lightly grease a standard muffin tin. Or line with paper muffin cups, and grease the cups with non-stick vegetable oil spray; this will ensure that they peel off the muffins nicely.

2) In a medium-sized mixing bowl, cream together the butter, vegetable oil, and sugars till smooth.

3) Add the eggs, beating to combine.

4) Stir in the baking powder, baking soda, nutmeg, cinnamon, salt, and vanilla.

5) Stir the flour into the butter mixture alternately with the milk, beginning and ending with the flour and making sure everything is thoroughly combined.

6) Spoon the batter evenly into the prepared pan, filling the cups nearly full.

7) Bake the muffins for 15 to 17 minutes, or until they’re a pale golden brown and a cake tester inserted into the middle of one of the center muffins comes out clean.

8.) In a medium bowl, prepare the glaze by mixing together the melted butter, confectioners’ sugar, vanilla and water. Whisk until smooth.

9.) When muffins have cooled slightly, dip the muffin crown into the glaze and allow the glaze to harden.   For the cinnamon sugar muffins, dip the muffin crown in butter then dip in cinnamon sugar mixture.  For the sugar coated muffins, dip the muffin crown in butter then sprinkle the top with sanding sugar.
10.) Serve warm, or cool on a rack and wrap airtight. Muffins will keep at room temperature for about a day.

Friday, August 27, 2010

Salad Caprese, The Sequel

This is my favorite summer time treat (besides ice cream!)  Tomatoes fresh off the vine (not ours unfortunately, this year), fresh mozarella cheese, basil and splashes of good olive oil and balsamic vinegar, seasoned to taste with salt and freshly ground pepper.  The classic Italian Salad Caprese. 

It is so simple with such a small number of ingredients yet the finished dish is ever so satisfying.  The Italians are very good at putting together recipes like this.  I have blogged this salad before here, but I'm particularly pleased with this version using heirloom tomatoes.  I just think they're gorgeous.