Sunday, September 28, 2008

A Tale of Two Frostings

It's birthday celebration time at the office tomorrow and as usual, I was selected to bring the dessert. This usually means a cake of some sort but I wasn't very interested in that as I had just baked a cake a couple of weeks ago.

Instead, I opted for cupcakes which are ALL THE RAGE it seems around the country. What is it with the cupcake phenomenon? There are entire bakeries and blogs devoted solely to the subject. I think the appeal is that each person gets their own mini-cake and for me, they are so reminiscent of childhood lunches. You can hold the little darling in your hand with it's protective paper wrapper and nibble away. Also, when done correctly, it is such a wonderful vehicle for the frosting which after all is the most important part of any good cake.

The cupcake used for this cooking session was a basic yellow cake mix as I had no time to do scratch cupcakes. The frosting choice was difficult though so I decided on two different ones for people to choose from. I made a refreshing lemon buttercream frosting and a more rich, smooth peanut butter frosting. Both turned out to be tasty and I believe a nice contract to each other. I didn't use a particular recipe for either but I will leave you with approximate measurements for each. Peanut Butter Frosting
2 cups sifted confectioners sugar
1 cup creamy peanut butter
1/4 cup softened butter
1/2 tsp vanilla
1/4 cup milk (more more to get desired spreadable consistency

Put all of the ingredients into a bowl and mix on medium speed until a smooth and creamy consistency is achieved. Frosts 12-14 cupcakes.

Lemon Frosting
2 cups confectioners sugar, sifted
2 Tablespoons fresh lemon juice
1/4 cup softened butter
1/4 cup milk (or more to get desired spreadable consistency)

Put all of the ingredients into a bowl and mix on medium speed until smooth and creamy. Frosts 12-14 cupcakes.

Saturday, September 27, 2008

A Guest's Pie

My blog has been out of commission for a couple of weeks due to severe technical difficulties with the computer. So severe in fact, that a new computer had to be ordered. Now, thanks to my own personal I.T. professional with whom I live (I'm so very lucky), we are up and running again.

Since I knew I wouldn't be able to blog for awhile I asked a co-worker if I could use his delicious recipe for a pie he so graciously brought to work to share with all of us last week. This multi-faceted fellow not only can bake pies, he also does beautiful calligraphy, sings in a master choir, gardens and is an all around good guy. So, without further ado, I present his delicious pie.

Sour Cream Apple Pie
Pastry for 9-inch One-Crust Pie
3/4 cup sugar
2 tablespoons all-purpose flour
1/8 teaspoon salt
1 cup dairy sour cream
1 tablespoon vanilla
1/4 teaspoon ground cinnamon
1 egg
2 cups chopped pared tart apples (about 2 medium)

Brown Sugar Topping
1/3 cup all-purpose flour
1/3 cup packed brown sugar
2 tablespoons firm margarine or butter
1/4 teaspoon ground cinnamon
1/8 teaspoon ground cloves
Mix all ingredients until crumbly.

Heat oven to 375 deg. Prepare pastry. Mix sugar, flour, and salt. Beat in sour cream, vanilla, cinnamon, and egg with fork until smooth. Stir in apples. Pour into pastry-lined pie plate. Bake until center is set,about 45 minutes.
Sprinkle Brown Sugar Topping over pie; bake until golden brown, about 15 minutes. 8 servings; 390 calories per serving.

Sunday, September 14, 2008

A Moist, Chocolatey Cake

I tried this recipe for Beatty's Chocolate Cake by one my favorite Food Network stars, Ina Garten and her show The Barefoot Contessa. I have one of her cookbooks and am on the lookout to purchase a few more. I love her cooking style, her ease in the kitchen and the success I have had with every recipe I have tried of hers. She use to have a column in Martha Stewart's Living Magazine which I use to enjoy reading each month.

I will not type out this recipe since it can be obtained through the link above or in Ina Garten's cookbook, Barefoot Contessa At Home. This cake was one of the easiest I have every made. It was really just three steps in preparing the batter; mixing the dry ingredients together, mixing the wet ingredients together, then combining the two. So often when making a cake by scratch you must alternate wet and dry but not this one. I was somewhat concerned as the batter was very runny but it turned out to be amazingly moist.
Above: The dry ingredients
Above: The wet ingredients

The cake also had an intense chocolate flavor which Ina contributes to the cup of freshly brewed coffee called for in the batter. I think it also has to do with using very high quality chocolate. I used a cocoa from Holland called Droste. I also dusted my pans with this same cocoa as opposed to the flour dusting Ina calls for in her recipe.
Above: Pans lined with parchment paper, dusted with cocoa, ready for batter.

Next time I make this cake I will probably utilize another chocolate frosting. Though the flavor of this frosting is delicious, it calls for 2 sticks of butter. It made the frosting too rich for our taste. Also, it is very, very soft and the cake must be refrigerated if not eaten immediately, especially when it is 85 degrees outside, as it was on this 13th day of September.Above: The frosting ingredients
Above: The cake ready for frosting.

I would highly recommend this cake for a great, old fashioned chocolate cake that all will enjoy!

Dried Cherry Biscotti

It's been a baking kind of weekend. Cookies and cake. Cookies for The Husband and cake for a last of the summer Bar-B-Que at the Mother-in-Law's. I'll start with the cookie recipe and talk about the cake in another entry. A favorite in our house is cherries. Cherry jam, cherry pie, cherry turnovers, plain cherries and dried cherry biscotti (I sound like Forrest Gump - fried shrimp, boiled shrimp, etc.....).

This recipe makes very good biscotti and they are fairly easy to make but are messy as I have found that when mixing the ingredients together it is far more effective to use one's hands then a spoon. They also take some tending to when baking them as they are twice baked and have to be cooled a bit after the initial baking and then cut, and then baked again in two 5 minute sessions. The end result is worth it though. They turn out crunchy, not too sweet and with nice sour bites with the dried cherries.

Dried Cherry Biscotti
2 1/2 cups all purpose flour
1 cup sugar
1/2 tsp baking soda
1/2 tsp baking powder
1/2 tsp salt
3 large eggs
1 tsp vanilla extract
2/3 cup chopped dried cherries (dried cranberries also work)
1 cup ground almonds
Sugar for the top (optional)
Lightly grease one cookie sheet. Preheat oven to 35o degrees.

Blend flour, sugar, baking soda, baking powder and salt in a large bowl. Add eggs and vanilla, beating until dough is formed. Stir in almonds and cherries.
Turn dough out onto lightly floured surface and kneed several times. Using the greased cookie sheet as a surface, divide the dough in half and form into two flat logs about 9 inches long by 3 inches wide. I like to press some sugar onto the tops for an added sweet crunch.Bake for 25 minutes or until lightly browned on top.
Let cool directly on baking sheet resting on a rack for 10 minutes.
Lower heat to 325 degrees. On a cutting board, cut the logs on the diagonal into 1/2 inch thick pieces. Put back in oven for 5 minutes. Turn over and bake 5 more minutes. Remove from cookie sheet and cool on a baking rack. Store in an airtight container.

Sunday, September 7, 2008

Cheesy Pesto Lasagna

I made a totally lazy version of lasagna using prepared tomato sauce and fresh lasagna sheets and it turned out quite well. Here is what made it a step above Costco's frozen lasagna (which isn't half bad). I mixed some of my homemade pesto in with the ricotta cheese and it really gave it a great basil/garlic taste. I also used some Paul Newman's Marinara Sauce and it too was fairly tasty. Putting together the whole thing couldn't have been easier.

This size lasagna would easily serve a family of four as opposed to how I usually make my lasagnas; big enough to feed a small army. Sometimes I forget that I am only cooking for two and I overdo it on size. Leftovers are great but not for 5 days in a row!
Cheesy Pesto Lasagna
4 sheets of fresh lasagna sheets
1 16 oz jar of marinara sauce
1 cup of pesto
1 1/2 cups of ricotta
1 cup of grated Parmesan cheese
2 cups of grated mozzarella cheese
Grease an 8 inch square baking pan. Mix ricotta cheese and pesto together until blended. Pour enough marinara sauce over the bottom of pan to cover. Place lasagna sheet over sauce. Cover sheet with ricotta/pesto mixture, dollop marina sauce over ricotta then sprinkle with both mozzarella and Parmesan cheeses. Continue layering in this manner ending with pasta covered with marinara sauce and mozzarella and Parmesan cheeses.
Cover with foil and bake at 350 degrees for approximately 45 minutes. Remove foil and place under broiler until cheeses are brown and bubbly. Watch carefully as cheeses can burn quickly. Let sit for 15 minutes before cutting to ensure everything holds together nicely.

Barbecued Beef (Korean Style)

Yesterday I had the urge to go to one of my favorite food shopping destinations, Uwajimaya in Beaverton. While living in Seattle I would occasionally drop by the original store when I was wandering around the Pioneer Square area. I was not a very adventurous cook in those days though, so the store didn't excite me as it does now. For those of you readers who aren't familiar, it's a huge grocery store that encompasses many Asian food cultures. It is quite an experience going up and down the aisles looking at products and not having a clue as to what they are or what they are for.

I had no menu in mind as I walked in the door and was delighted to find a large kiosk filled with recipe cards of all sorts. After glancing through them, I decided on the following recipe for something called Bulgogi or Korean style barbecued beef. It didn't indicate on the recipe what type of beef to use so I chose the beef pictured below. I found the labeling to be quite humorous regarding the 100% vegetarian diet statement. It's good to know this cow had low cholesterol, even if I don't. Anyway, this was a very easy meal to prepare and I grilled the beef on my cast iron grill pan as opposed to a charcoal barbecue which would be the more traditional way to go.
Bulgogi Barbecued Beef
1 lb. beef steak, thinly sliced
Sauce
1/4 cup Soy Sauce
2 Tbsp. honey
1 tsp minced garlic
1 tsp minced fresh ginger root
1 Tbsp sesame seed oil
1/4 cup chopped green onions
1 tsp (or more to taste) red chili flakes
1/2 tsp black pepper

Combine all the sauce ingredients together in a bowl. Add sliced beef and allow to marinate for a minimum of 2 hours or overnight. Cook meat until rare. I served this with jasmine rice, grilled green onions, and a side salad of cucumber ribbons dressed with seasoned rice vinegar which was a nice cool compliment to the hot beef dish.

Thursday, September 4, 2008

The Cherry Tomato Harvest

Finally the cherry tomatoes are ripening faster than we can pop them in our mouths and eat so I decided to make salsa with some of them. I didn't want to make the run of the mill Salsa Cruda so I decided on a black bean salsa that I adapted from a recipe from a former employee.

It's delicious with chips of course, but also good as a salad on it's own or served as a side dish/sauce with fish such as red snapper. It couldn't be more simple to put together once you have all the chopping done which as I have mentioned before, I enjoy doing very much. I find mincing, chopping, and dicing therapeutic in a mind numbing kind of way. It's such a needed change from my often frantic office pace.

Black Bean Salsa
1 can of Black beans, rinsed and drained
1/2 bag of frozen white corn kernels
1-2 jalapeno peppers, cored and seeded (dependent on individuals heat tolerance)
1 avocado, cubed
3 cups of quartered cherry tomatoes (any tomatoes will work)
cilantro leaves chopped to taste
1/3 cup finely minced white onion
Dressing
1/4 cup olive oil
1/8 cup lime juice
1/4 tsp salt
1/4 tsp ground cumin
2 large garlic cloves finely minced
Toss all of the salsa ingredients together in a bowl. Whisk the dressing together until emulsified then thoroughly mix into salsa. Let sit for an hour to combine flavors. Isn't it pretty?

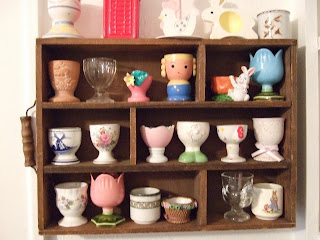
Another Collection

I spoke in my last blog entry about my cookbook collection and today I thought I would share another one of my prized collections, my egg cups. Like my cookbooks, I only started this collection in 1990 when I moved to Salem and had the opportunity to go to garage sales and also many antique and collectible stores in the vicinity.
My only criteria when I started collecting was that I would not spend more than $10 on one as I was a single gal on a single income and tried to be budget conscious. My collection grew in leaps and bounds as they were very easy to find. Over the last few years though, it has become much more difficult to find unique egg cups and I also have narrowed my collection to just egg cups which are figures of animals that actually lay eggs.

I have well over one hundred cups in my collection at this point, so many in fact, that I don't have room to display them all. The pictures today include the majority of them but I do have a box in the basement with a few duplicates and less than unique ones.

While in England once, I went to a seconds china store and was so amazed to find an entire wall of the store devoted to charming egg cups. Those Brits like their boiled eggs. I don't remember which in my collection I obtained there but I know I bought a couple. My parents too would bring me home cups from England on their many trips to the "motherland." Friends and other family members have been most generous also, contributing to my large collection.
I find it quite curious that many people don't even know what an egg cup is when I mention my collection. Don't ask me how that would even come up in conversation but it has. Growing up, my mother had a few egg cups in the shape of a rooster from which we would eat our soft boiled eggs.

I'll now share with you my dirty little secret. I don't even like soft boiled eggs anymore. But I love my collection!

Monday, September 1, 2008

Dulce Delicious

The Husband likes my homemade ice cream. He devours it by the Gladware tubful. I make the most simple ice milk recipe which I made up after much trial and error (he doesn't like it too creamy) and named it Ice Ice Baby. It is just 1 quart of whole milk, 1/2 cup of half and half, 1/2 cup of superfine sugar and 1 Tablespoon of vanilla. No cooking of custard is involved and it turns out hard as a rock and did I mention, HE LOVES IT.

Well today I decided to make ice cream that sounds good to me. It's called Dulce de Leche ice cream and it is delicious and ever so simple as it too requires no cooking. If you have an ice cream maker, give it a try. You'll be glad you did.
Dulce de Leche Ice Cream
2 cups whole milk
1 cup heavy cream
1 2/3 cups canned dulce de leche (found with the evaporated milk or in the Hispanic section of the grocery store).
1/2 tsp vanilla.

Bring milk and cream to a boil in a saucepan, lower heat and whisk in the dulce de leche until melted. Add the vanilla then place the mixture in a bowl over an ice bath until chilled.
Mix in ice cream maker following manufacturer's instruction. My ice cream was fairly soft when done so it required a good 4 hours to harden in the freezer.