Sunday, December 26, 2010

Homemade Granola Bars

I will never buy granola bars again now that I have discovered how very tasty and easy they are to make at home.  I like to put a morning snack in my purse for those times when I am about to go sit in a two hour meeting at work and my stomach is grumbling for lunch. There is nothing more embarrassing than stomach growls in a quiet meeting. OK, I guess there could be some things more embarrassing!

I found this recipe while browsing through one of my cookbooks called A Taste of Oregon which was gift, I believe from my best friend in the early '80s.  It was published by the Junior League of Eugene. It is chock full of wonderful recipes, many using local ingredients easily found in Oregon such as seafood and fresh vegetables.

This is one of those very adaptable recipes where the extra additions can be anything that suits you.  I chose to add chopped pecans, shredded coconut and dried cranberries.  It was a wonderful combination of ingredients.  The other variation I made was to use treacle, an English golden syrup, instead of the honey.  It adds a light molasses taste which is just delicious. 

This will be a recipe I will make again and again.
Granola Bars

3/4 cups butter
1/2 cup brown sugar
1/2 cup honey
1 tsp vanilla
1/2 tsp salt
4 1/2 cups granola cereal
2/3 cups chopped nuts, coconut, dried fruit, seeds

In a 3 quart pan melt butter, then add brown sugar, honey, vanilla and salt;  stir until blended.  Stir in granola and extra goodies of your choice.  Pour into a well greased 10 x 15 inch pan.  With your hands, press in firmly to form an even layer.  Bake uncovered in a 400 degree oven until browned and bubbly, about 10-15 minutes.  Watch carefully because these get dark quickly.  Cool slightly and cut into bars while still warm.

Sunday, December 19, 2010

Easiest Candy Ever

Okay.  I've not been very inspired to cook as of late.  I began a new job a few weeks ago and it is taking all the energy I can muster to take in all that I have to learn.  Because of that, my weekends have become a precious commodity, not to be spent cooking and then having to clean the kitchen (that's the part I am trying to avoid!)

Anyway, I felt I had to get into the spirit and make at least one holiday goodie and this is what I came up with; a tremendously easy white chocolate/peppermint bark.  Here's the recipe and the variations are what ever you feel like throwing on top of a sheet of melted chocolate.
White Chocolate Peppermint Bark

1 lb. premium white chocolate
1 cup crushed peppermint candy

Slowly melt chocolate over a double boiler or even easier, put it in a microwave container and set the timer on 30 seconds.  Stir, put in for 30 seconds more, stir, etc. until it is almost entirely melted then just keep stirring until it is completely smooth.
Pour melted chocolate onto a sheet pan and spread evenly.  Sprinkle the peppermint chips on top and let cool completely.  Take sheet of chocolate out of pan and cut into bite size pieces.

Sunday, December 12, 2010

Hasselback Potatoes

This blog is dedicated to Patti, Peggy, Robin and Debbie, my peeps in high school.   The recipe today is Hasselhoff Hasselback potatoes.  When I first read the name of these Swedish-style baked potatoes, my very favorite soap opera star of all times, David Hasselhoff immediately came to mind.  I know I'm not alone in voting him the sexiest of daytime stars from the early years of the 1970's, right girls??
We would race home to watch Dr. Snapper Foster in our fave rave soap opera, The Young and the Restless and swoon.  All of the other TV doctors paled in comparison.  Who needed Dr. Steven Kiley on Marcus Welby or Dr. Joe Gannon on Medical Center when Snapper Foster was curing all that was wrong in Genoa City?   And there was plenty wrong! 

WHAT HAPPENED???  Poor, pitiful David Hasselhoff can't catch a break these days.  It all went down hill after the infamous hamburger eating incident, caught on video by one of his "loving" daughters.  Who amongst us hasn't gotten the munchies after having a cocktail or two and felt the need to shove an entire hamburger into our gaping maw, all at once?  And now his newest TV venture, a "reality" show was cancelled after only one episode.  Oh well, we will always have our memories of Snapper Foster - a teenage girl's fantasy doctor.

Now on to the recipe.  Very simple.  The tricky part is cutting the potatoes into slices without going all through the other side.  I stuck a couple of chopsticks on either side of the potato and cut through until I hit them and didn't slice through once.  The results were lovely, crisp on the outside, creamy on the inside, slices of yummy potatoes.  This is a wonderful alternative to the boring old baked potato that often accompanies our meatloaf dinner.  Enjoy and thanks for indulging me in my walk down memory lane.

Hasselback Potatoes

Medium size baking potatoes.

Olive Oil
Salt and Pepper
Butter
Garlic slivers, onion slivers, any spices you'd like to sprinkle on your potatoes.

Preheat oven to 425 degrees F.  Wash potatoes well. Lay each potato on a cutting board.
With a sharp knife, thinly slice each potato, being careful to not cut all the way through. (Tip: I lay a chopstick on each side of the potato so I don't accidentally cut too far.)
Season each potato.  You could get creative, slide a sliver of garlic between the layers, experiment with different herbs, butter, use whatever might sounds good to you.

Place potatoes in a baking dish that has been drizzled with olive oil. Drizzle potatoes with olive oil.  Bake at 425 degrees for 40 min, or until the inside is tender.

Wednesday, December 8, 2010

A Turkey Leftover Alternative

For a nice change a pace from turkey, turkey and more turkey, how about some Chinese food.  This recipe comes from one of my favorite Asian cookbooks which I have mentioned before called Steamy Kitchen by Jaiden Hair.  It incorporates many styles of Asian food including Chinese, Korean, Vietnamese and even Philipino.  The recipes are easy to follow and the photos are amazing.  The author also has a wonderful food blog by the same name.

This particular recipe caught my fancy and though it was really simple to make, it does take four different bottled sauces. These include soy sauce, oyster sauce, Chinese black vinegar and Chinese rice wine, plus I used sesame oil to saute in.  Luckily when I went to my local Asian market I was able to find the three that I didn't have for very reasonable prices and these bottles should last awhile.  I did splurge on the meat and purchased a boneless rib eye but considering this made three servings from one steak, it was worth it and oh so tender!

Stir Fry Beef Broccoli

1 lb top sirloin or flank steak, sliced into 1/8-in strips


For the marinade

1½ teaspoons soy sauce
1 teaspoon cornstarch
½ teaspoon cooking oil

For the Stir-fry Sauce

3 tablespoons oyster sauce
2 teaspoons Chinese rice wine (or dry sherry)
2 teaspoons Chinese black vinegar

For the Broccoli

1 broccoli, cut into bite-sized florets
½ teaspoon kosher or sea salt
1 tablespoon cooking oil
1 tablespoon minced garlic

Marinate the beef in soy sauce, cornstarch and the ½ teaspoon of oil for 10 minutes at room temperature.

In a small bowl, mix together the stir-fry sauce ingredients.

In a wok or large frying pan, add 1 inch of water and salt and bring to a boil. Add the broccoli and cover to steam for 3 minutes. Broccoli should be bright green, crisp tender and you should be able to pierce the stem with a fork. Drain.

Discard the water in the pan and dry the pan well. Heat the pan over high heat and when hot, add the 1 tablespoon of cooking oil and swirl to coat. Add the garlic and fry for 15 to 30 seconds, until fragrant. Add the steak strips, keeping them in one layer and fry 30 seconds. Flip the strips and fry the other side.

Pour in the stir-fry sauce and stir to combine. Simmer until the sauce is thick enough to coat a back of a spoon, about 30 seconds. Add the cooked broccoli back into the pan and toss to coat well.  Serve over hot Jasmine white rice.

Tuesday, November 30, 2010

Turkey Wild Rice Soup

With the last little tidbits of turkey left from Thanksgiving it was time to make soup, and what a satisfying soup it was.  A few years ago I read about making turkey stock prior to turkey day and freezing  it so it is on hand for the gravy, which is what I do each year.

This exercise entails buying a few turkey wings, which I find out Whole Foods or a local grocery store, if I'm lucking.  I roast those for 45 minutes to an hour until they are nice a browned then throw them in a stock pot with the usual soup makings including water, celery, carrots, parsley, garlic, salt, pepper, fresh thyme and a bay leaf.  This is left to simmer for a couple hours, strained, then refrigerated overnight.  In the morning, the fat is skimmed off the top and the stock is ready for the freezer. 
I had a leftover quart of stock which made the perfect base for my turkey wild rice soup.  This rice is something I buy at our local farmers market and it is a really nice blend of a variety of rices including, wild, red, brown and white rice.  The rest of the soup consisted of celery, carrots, some onion, frozen peas and the leftover turkey.  Serve with rolls or as I did, hot popovers and you have a great meal.
Thanksgiving 2010-The End!

Tuesday, November 23, 2010

Thanksgiving Appetizers

I have been having the time of my life planning and cooking for Thanksgiving dinner this year.  It will be traditional in every sense of the word.  Personally, I don't think Thanksgiving is the time to try out new recipes.  People (and I mean me) like the old standards: turkey, dressing, cranberries, mashed potatoes, veggies, gravy, pie.  Oh sure, go ahead and throw in another pie besides pumpkin or shake it up a bit and add some garlic to the mashed potatoes but leave the rest alone.

Now here is where you can deviate a little bit.  The appetizers.  Of course you don't want to serve anything very filling as there will be much to contend with during the main feast.  But a few tasty tidbits to whet peoples appetite is just fine.

I read this recipe for Parmesan Cream Crackers from the New York Times "The Minimalist" column written by Mark Bittman and it sounded like the perfect bite, served with a variety of olives and a sparkling wine or cider.  Let me tell you, once you've tried these delicate, flavorful morsels you will never want to eat a Goldfish  cracker again!  They are cheesy, flaky, easy to make and sooooo good! 

Happy Thanksgiving everyone!!

Parmesan Cream Crackers

1 cup all-purpose flour, more as needed
1/2 teaspoon salt
Pinch of cayenne pepper (optional)
1/2 cup finely grated fresh Parmesan cheese
4 tablespoons cold, unsalted butter, cut into small cubes or grated (a very good way to do it)
1/4 cup cream or half-and-half, more as needed

Coarse salt, pepper, sesame or poppy seeds, minced garlic or whatever you like for sprinkling (optional).
Heat oven to 400 degrees. Line a baking sheet with parchment paper or lightly dust with flour. Put flour, salt, cheese and butter in bowl of a food processor. Pulse until flour and butter are combined. Add about 1/4 cup cream or half-and-half and let machine run for a bit; continue to add liquid a teaspoon at a time, until mixture holds together but is not sticky.  I actually combined everything by hand and it turned out just fine and very easy to roll and cut.

Roll out dough on a lightly floured surface until 1/2-inch thick or even thinner, adding flour as needed. Cut with 1-2 inch biscuit cutter or transfer sheet of dough to prepared baking sheet (drape it over rolling pin to make it easier). Score lightly with a sharp knife, pizza cutter or a pastry wheel if you want to break crackers into squares or rectangles later on. Sprinkle with salt or other topping if you like.

Bake until lightly browned, about 10 minutes. Cool on a rack; serve warm or at room temperature or store in a tin for a few days.

Wednesday, November 17, 2010

Beef Barley Soup

These damp Fall days always make me want to bring out my favorite soup kettle and spend an hour or two in the kitchen cutting, chopping and stirring up a pot full of goodness.  This weekend beef barley soup was on the agenda.  My BFF Patti was talking about her husband's delicious vegetable barley soup he had made earlier in the week and it inspired me. 
This was a great recipe to make as I had everything I needed in the cupboard and freezer except for carrots.  I always like to cut up my own stew meat from a chuck roast. You know what you're getting that way.  Also, I just love the process of chopping up all of the veggies even though I have a fancy food processor that would do all that work in half the time.  It's such a therapeutic thing for me to do.  I get the radio on NPR and listen to the entertaining Saturday morning shows and before I know it, the soup is simmering away.

Serve this wonderful beef soup with a crusty piece of bread and a hearty glass of red wine for a delicious meal.  There will be plenty for leftovers throughout the week too!

Beef Barley Soup

1/4 cup olive oil
2 cloves garlic, peeled and halved lengthwise
1 pounds beef chuck stew meat, cut into 1-inch chunks and patted dry
1/8 teaspoon freshly ground black pepper
2 quarts beef stock or broth
1/4 pound medium pearled barley, rinsed in cool water and drained (NOT THE QUICK COOK!)
1 yellow onion, chopped
2 stalks celery, cleaned, trimmed, and cut into 1/2-inch slices
3 large carrots, peeled and sliced into 1/2-inch slices
3 large potatoes, peeled and diced
1/2 teaspoon dried oregano
1 teaspoon dried thyme
1 28-ounce cans plum tomatoes, drained (I cut these up before adding)
1 cup frozen peas
1 cup frozen corn
1/4 cup fresh parsley, finely chopped

Heat olive oil over medium heat in a 10- to 12-inch skillet. Add the garlic and cook until golden. Using a slotted spoon, remove and discard the garlic. Working in batches, add a single layer of beef cubes to the skillet and sear on all sides. Remove each batch with a slotted spoon, and sprinkle with black pepper. Leave the remaining oil in the skillet, and set it aside.

In a 5-quart soup pot, bring the stock or broth to a simmer. Add the browned beef and rinsed barley, cover, and return to a full simmer. Reduce heat and cook gently for about 1 1/2 hours.
Return the skillet to medium heat and add 2 tablespoons of olive oil. Heat and add the onion, celery, carrots, and potatoes. Stir in the oregano and thyme. Cover the skillet and cook over very low heat for about 15 minutes.

Transfer the vegetables to the simmering soup, then add the chopped tomatoes, peas and corn. Simmer for 15 minutes and add chopped fresh parsley before serving. Yield: about 10 servings

Wednesday, November 10, 2010

420 Miles in 24 Hours

The Husband and I got in our car on Sunday morning with our goal being a relaxing 24 hour mini-vacation and indeed, we got exactly that. I thought I'd share a few pictures from our great excursion to Bend via the Columbia Gorge and then home through the Cascades. I never tire of the beauty that is Oregon! No recipes this week. I'm taking a respite from the kitchen.

There were little creeks and mighty rivers.


There were spectacular waterfalls and towers up to the clouds.


There were salmon fighting the current to go home upriver and The Husband fighting the snow through the mountains to deliver us home safely!

Thursday, November 4, 2010

Butterscotch Pie O My

Here is a pie made from two different sources.  The pie crust is from Cooks Illustrated, the group that takes a recipe and using science, comes up with foolproof ways to make them the best they can be.  I saw their show one Saturday where they used this vodka pie crust recipe and thought I would give it a "shot"(pardon the pun).  It certainly worked fine, but I think I will stick to the Dorie Greenspan foolproof recipe I last tried for pie crusts as my go-to method.

The butterscotch pudding recipe is from a Better Homes and Gardens Holiday magazine I recently purchased.  It is actually from a Butterscotch Meringue Pie but the sound of the meringue part didn't thrill me so I just made the filling and it was by far, the best butterscotch pudding I have ever tasted.

One note:  This pie does not travel well as noted by the Tupperware of mush we ended up delivering to my mother-in-law and brother-in-law.  Though it wasn't very pretty, I hope it tasted fine.
Vodka Pie Crust
(this makes a single crust)

1 1/4 cups unbleached all-purpose flour
1/2 teaspoon table salt
1 tablespoons sugar
6 tablespoons cold unsalted butter, cut into 1/4-inch slices
1/4 cup cold vegetable shortening, cut into 2 pieces
2 Tbsp cold vodka
2 Tbsp cup cold water

Process 3/4 cups flour, salt, and sugar in food processor until combined, about 2 one-second pulses. Add butter and shortening and process until homogeneous dough just starts to collect in uneven clumps, about 15 seconds (dough will resemble cottage cheese curds and there should be no uncoated flour). Scrape bowl with rubber spatula and redistribute dough evenly around processor blade. Add remaining flour and pulse until mixture is evenly distributed around bowl and mass of dough has been broken up, 4 to 6 quick pulses. Empty mixture into medium bowl.

Sprinkle vodka and water over mixture. With rubber spatula, use folding motion to mix, pressing down on dough until dough is slightly tacky and sticks together.  Flatten dough into 4-inch disk. Wrap in plastic wrap and refrigerate at least 45 minutes or up to 2 days.
Once chilled, roll out the pie crust using quite a bit of flour on your board, as it is a sticky dough. Place in 9 inch pie pan gently and turn under 1 inch overlay of dough and crimp edges. Or you can do as I did and make a decorative pattern and applique them on to the edges of the pie using egg white as your glue.

Place crust in the fridge while preheating the oven to 425 degrees. Place a vegetable oil sprayed piece of foil pressed into the crust and fill with pie weights or beans and bake for 15 minutes.  Take from oven, carefully remove foil and weights and bake for another 10 minutes until crust is golden brown.  Cool on a rack.  Once cooled, it is ready for a pre-cooked filling.
Butterscotch Filling

3/4 cup packed brown sugar
1/4 cup cornstarch
1/4 tsp salt
1 12 oz. can evaporated milk
3 egg yolks
1 cup milk (I used non fat and it worked fine)
3 Tbsp butter, cut into pieces
1 tsp vanilla

In a medium saucepan, combine brown sugar, cornstarch and salt. Whisk in about 1/2 cup of the evaporated milk.  Whisk in the egg yolks until combined.  Whisk in the remaining milks. Cook over medium heat until thickened and bubbly, stirring constantly.  Remove from heat. Stir in butter and vanilla. Put a piece of plastic wrap on the surface so a skin doesn't form while mixture cools.

Put in cooked pie crust and refrigerate 4-5 hours.  I decorated mine with whipped cream and shards of hardened caramelized sugar.  To do this I just cooked 1/2 cup of granulated sugar over high heat in a shallow pan, swirling pan constantly until sugar was melted completed and a medium amber color. Be very careful as once the sugar starts to turn amber it can get too dark and bitter quickly.  I then poured this onto a greased piece of foil, let it cool completely, then broke it into small pieces.  It was a nice addition to the butterscotch flavored pie.

Friday, October 29, 2010

Fall is Here, Time for Apples


It's apple time in the Pacific Northwest so it's time for a wonderful variety of apples at our local farmers markets and grocery stores.  I can't resist buying apples when they are at their peak and eating them crisp and cold from the fridge.  Occasionally though, a cooked apple dessert is just the thing for a Fall day and when I saw this recipe in the Oregonian, I knew it was a must try.
This comes from one of my favorite cookbook authors and collaborators, Dorie Greenspan who has worked with many famous chefs such as Julia Childs amongst others and has developed amazing books, including her own Baking: From My Home to Yours.  She has recently come out with her newest book called  Around My French Table and this recipe is included.  I have yet to purchase it but I have read great things and look forward to ordering it from Amazon very soon.

A little about this cake.  It is all about the apples which have a very thin  layer of cake surrounding them.  I used two varieties; Honey Crisp and Liberty to make my version but Ms. Greenspan recommends using 4 different types to get a mix of tart and sweet and a variety of textures.  It's a delicious dessert and very simple and quick to put together.

Marie Helene's Apple Cake

3/4 cup all-purpose flour
3/4 teaspoon baking powder
Pinch of salt
4 large apples
2 large eggs
3/4 cup sugar
3 tablespoons dark rum
1/2 teaspoon pure vanilla extract
1 stick of unsalted butter, melted and cooled

Preheat the oven to 350 degrees F and center a rack in the oven. Butter an 8 inch springform pan. Line a baking sheet with a silicone baking mat or parchment paper and put the springform pan on it. Set aside.

Whisk the flour, baking powder, and salt together in a small bowl.

Peel the apples, cut them in half, and remove the cores. Cut the apples into 1 to 2 inch chunks.
In a medium bowl, beat the eggs with a whisk until foamy. Pour in the sugar and whisk until smooth. Whisk in the rum and vanilla. Whisk in half of the flour mixture, when it’s incorporated, add half of the melted butter, followed by the remaining flour mixture and butter. Mix in between additions so you have a smooth, thick batter.

Fold in the apples with a rubber spatula. Pour batter into prepared pan. Spread with spatula so the batter is somewhat even.
Slide the pan in the oven and bake 50-60 minutes, or until the top of the cake is golden brown and a knife inserted in the center comes out clean. Transfer to a cooling rack and cool for five minutes.

Run a knife around the edges of the cake and remove from the pan. Cool cake until slightly warm or at room temperature. If you want to remove the cake from the pan, wait until the cake is completely cooled. Slide a long spatula between the cake and pan, cover the top of the cake with a piece of parchment or wax paper, and invert it onto a rack. Carefully remove the bottom of the pan and turn the cake over onto a serving platter.

Friday, October 22, 2010

Pork Paillards with Sour Cream-Paprika Sauce

Sometimes I just have to sit down and go through the ever growing stacks of magazines that accumulate around the house and pull out recipes and articles I may use at a future date and then get the rest into the recycle bin.  Otherwise our house would be inundated by them.  Yesterday was that kind of day, though I must admit I barely made a dent in the piles.

I did come across this wonderful and quick dish in a Martha Stewart magazine.  Her publications are always filled with such great recipes, decorating ideas and interesting articles it's hard for me to throw them away.  But get rid of them I must, lest I become the next star on the show Hoarders-Buried Alive, with my out-of-control magazine addiction!

This is a very fast recipe and from start to finish, this dinner took no more than 30 minutes to put together and it was a winner.

Pork Paillards with Sour Cream-Paprika Sauce
(Serves 4)

8 pork paillards
Salt and Pepper to taste
Flour for dusting meat
2 Tbsp oil
1/4 cup finely chopped onions
1/4 cup dry white wine
1/2 cup low sodium chicken stock
1/3 cup sour cream
1/4 tsp paprika

Season pork with salt and pepper on both sides then dust lightly with flour.  Heat oil in a large skillet over medium-high heat.  Add 4 paillards and saute on 1 side until golden brown, approximately 1-2 minutes.  Flip and saute paillards until cooked through about 1 minute.  Transfer to a plate.  Repeat with remaining meat.

Saute onions for 2-3 minutes until transparent.  Add white wine to skillet and deglaze pan; cook until wine reduces by half, about 1 minute.  Add chicken stock and any plate juices.  Simmer until sauce reduces by half, about 2 minutes.  Gradually add in the sour cream and the paprika.  Season to taste.  Serve with buttered parsley noodles.

Friday, October 15, 2010

Chocolate Covered Marshmallow Cookies

This is a cookie from my youth, either in this shape or in the pinwheel shape, which were my particular favorites.  I found this recipe in the September 2010 issue of Martha Stewart's Everday Food magazine and just knew I had to try them.  This is not a recipe if your goal is to whip out a batch of cookies in a hurry.  These took some time but were totally worth the effort.  The recipe states it makes 18, but I only managed to get ten out of the dough and had only enough chocolate, even after adding three more ounces, to coat nine cookies.  Oh well, nine cookies are better than none!!

Chocolate Covered Marshmallow Cookies
(as adapted from Everyday Living Magazine)

1/4 cup plus 2 tablespoons all-purpose flour, plus more for working
1/4 cup plus 2 tablespoons whole-wheat flour
1/4 teaspoon coarse salt
1/4 teaspoon baking soda
1/4 teaspoon baking powder
1/4 teaspoon ground cinnamon
3 tablespoons unsalted butter, room temperature
3 tablespoons packed light-brown sugar
1 large egg
9 large marshmallows, halved
9 ounces semisweet chocolate, coarsely chopped
Preheat oven to 350 degrees, with racks in upper and lower thirds. In a medium bowl, whisk together flours, salt, baking soda, baking powder, and cinnamon. In a large bowl, using an electric mixer, beat butter and brown sugar on high, scraping down bowl as needed, until light, 4 minutes. Add egg and beat to combine, scraping down bowl as needed. With mixer on low, gradually add flour mixture and beat until combined.
Drop dough by tablespoonfuls, 3 inches apart, onto two parchment-lined baking sheets. With the bottom of a measuring cup dipped in flour, flatten cookies to 2 inches in diameter. Bake until dry and set, about 7 minutes, rotating sheets halfway through. Remove from oven and top each cookie with a marshmallow half. Bake until marshmallows are soft, 2 minutes.
Remove from oven and, with a metal spatula sprayed with vegetable spray, gently flatten each marshmallow. Let cookies cool completely on sheets on wire racks.
Place chocolate in a medium heatproof bowl and microwave in 30 minute increments, stirring often, until chocolate is thoroughly melted. Place one cookie at a time on tines of a fork, submerge in chocolate, then tap fork on edge of bowl to remove excess. Place on wire rack set over a baking sheet. Let cookies set in refrigerator, about 10 minutes.

Friday, October 8, 2010

Mom's Clam Dip

This blog entry is in honor of my mother's clam dip.  It is a family tradition.  There isn't a family gathering that goes by where this isn't served by someone.  Sometimes the simplest of food items can evoke such strong memories and for me, this is one of those items. 

Growing up, my parents use to throw parties in our remodeled basement which was where it was "happening."  There was a bona fide bar with three built in bar stools that were ever so fun to spin around on. There were two large mirrors on the walls.   There was a red linoleum tile floor, a couch, chairs and a piano.  Eventually it was additionally decorated to resemble an English pub, with English beer glasses, a map of the Underground and various other souvenirs my parents collected on their travels to England.

Well, back to the clam dip.  The day after these parties I would go down to explore the aftermath where it smelled of stale beer and cigarette smoke (weren't the '60s something) and inevitably there would be left over chips and clam dip sitting around.  Not for long!  Nothing better than slightly soggy potato chips and clam dip which has been out all night. 

We're all grown up now and I wanted to make sure I got this recipe (I use the term lightly as I don't believe there is a recipe) written so it can be passed on to the next generation.  Like my grandmother's English tarts, my mother's clam dip is and shall remain a family tradition.

Mom's Clam Dip

1 8oz package cream cheese at room temperature
1/2 tsp. garlic powder
2 Tbsp. mayonnaise
1 can chopped clams, undrained

Beat cream cheese, garlic powder, mayonnaise and approximately 2/3 of the clam juice until smooth and creamy.  Drain clams of remaining juice.  Add clams to cream cheese mixture and stir until blended.  Serve with chopped veggies and potato chips.

This is my take on this concoction.  I'm sure my two sisters have their own variations, but the basics would be the same.

Monday, October 4, 2010

Lunch At The Coast

The Husband and I took off one recent beautiful, sunny Fall Saturday and drove to Newport on the Oregon coast for a walk around downtown and lunch at Mo's.  You Oregonians will be familiar with Mo's delicious clam chowder. 
It's worth the drive just for a cup, along with their yummy cheesy garlic bread.  The day was perfect and it was a fantastic, much needed get-away.

Wednesday, September 29, 2010

Homemade Cannelloni

Here is a divine recipe for that special occasion when you have a lot of time for cooking and you want to make an impressive, delicious dish for a crowd.  The beauty of this recipe is that all of the components can be made in advance, the dish can even be assembled the day before one's dinner and the last minute kitchen preparation time is avoided. 

If there is one thing I can't stand about entertaining, it's being stuck in the kitchen slaving over the oven while my guests are all having fun without me.  I often look for recipes just like this one that can be done ahead of time when I am going to entertain a group.  An unstressed hostess is a good hostess!

This is such a sublime dish.  The crepe "noodles" are the most delicate of creations.  I suppose those no-bake lasagna noodles could be cooked up in a pinch and used as a substitute but oh, they just wouldn't have the consistency that these had.  It's a great recipe for the vegetarians in the crowd too.  Be sure and let this sit after taking out of the oven for at least 15 minutes before cutting into it so the cheeses congeal a little bit before serving.

Homemade Cannelloni

For sauce

3 tablespoons olive oil
1 medium onion, chopped
3 garlic cloves, minced
2 (28- to 32-oz) cans Italian tomatoes in juice, drained, reserving juice, and finely chopped
1/2 cup water
1 teaspoon sugar
1 teaspoon salt
1/4 cup chopped fresh basil

For crêpes
3 large eggs
1 1/2 cups water
1 1/4 cups all-purpose flour
1/2 teaspoon salt
1 tablespoon unsalted butter, melted

For filling
2 lb fresh ricotta (3 cups)
2 large eggs
1 oz finely grated Parmigiano-Reggiano (1/2 cup)
1/3 cup chopped fresh parsley
1/2 teaspoon salt
1/2 teaspoon black pepper
1/2 lb fresh mozzarella  (I used small, fresh mozzarella balls)

Special equipment: 2 glass or ceramic baking dishes, one 13 by 9 inches and one 8 inches square

Make sauce:
Heat oil in a 5- to 6-quart heavy pot over moderately high heat until hot but not smoking, then sauté onion, stirring occasionally, until golden, about 6 minutes. Add garlic and sauté, stirring, until golden, about 1 minute. Add tomatoes with juice, water, sugar, and salt and simmer, uncovered, stirring occasionally, until thickened, about 30 minutes. Stir in basil and remove from heat.

Make crêpes:
Break up eggs with a wooden spoon in a medium bowl and stir in water until combined (don't beat). Sift in flour and salt, then stir batter until just combined. Force through a medium-mesh sieve into another bowl.

Lightly brush an 8-inch nonstick skillet with melted butter and heat over moderate heat until hot. Ladle about 1/4 cup batter into skillet, tilting and rotating skillet to coat bottom, then pour excess batter back into bowl. (If batter sets before skillet is coated, reduce heat slightly for next crêpe.) Cook until underside is just set and lightly browned, about 30 seconds, then invert crêpe onto a clean kitchen towel to cool completely. Make at least 11 more crêpes in same manner, brushing skillet with butter as needed and stacking crêpes in 3 piles.

Make filling and assemble cannelloni:
Stir together ricotta, eggs, Parmigiano-Reggiano, parsley, salt, and pepper.

Put oven rack in middle position and preheat oven to 425°F.

Cut mozzarella lengthwise into 1/4-inch-thick sticks.

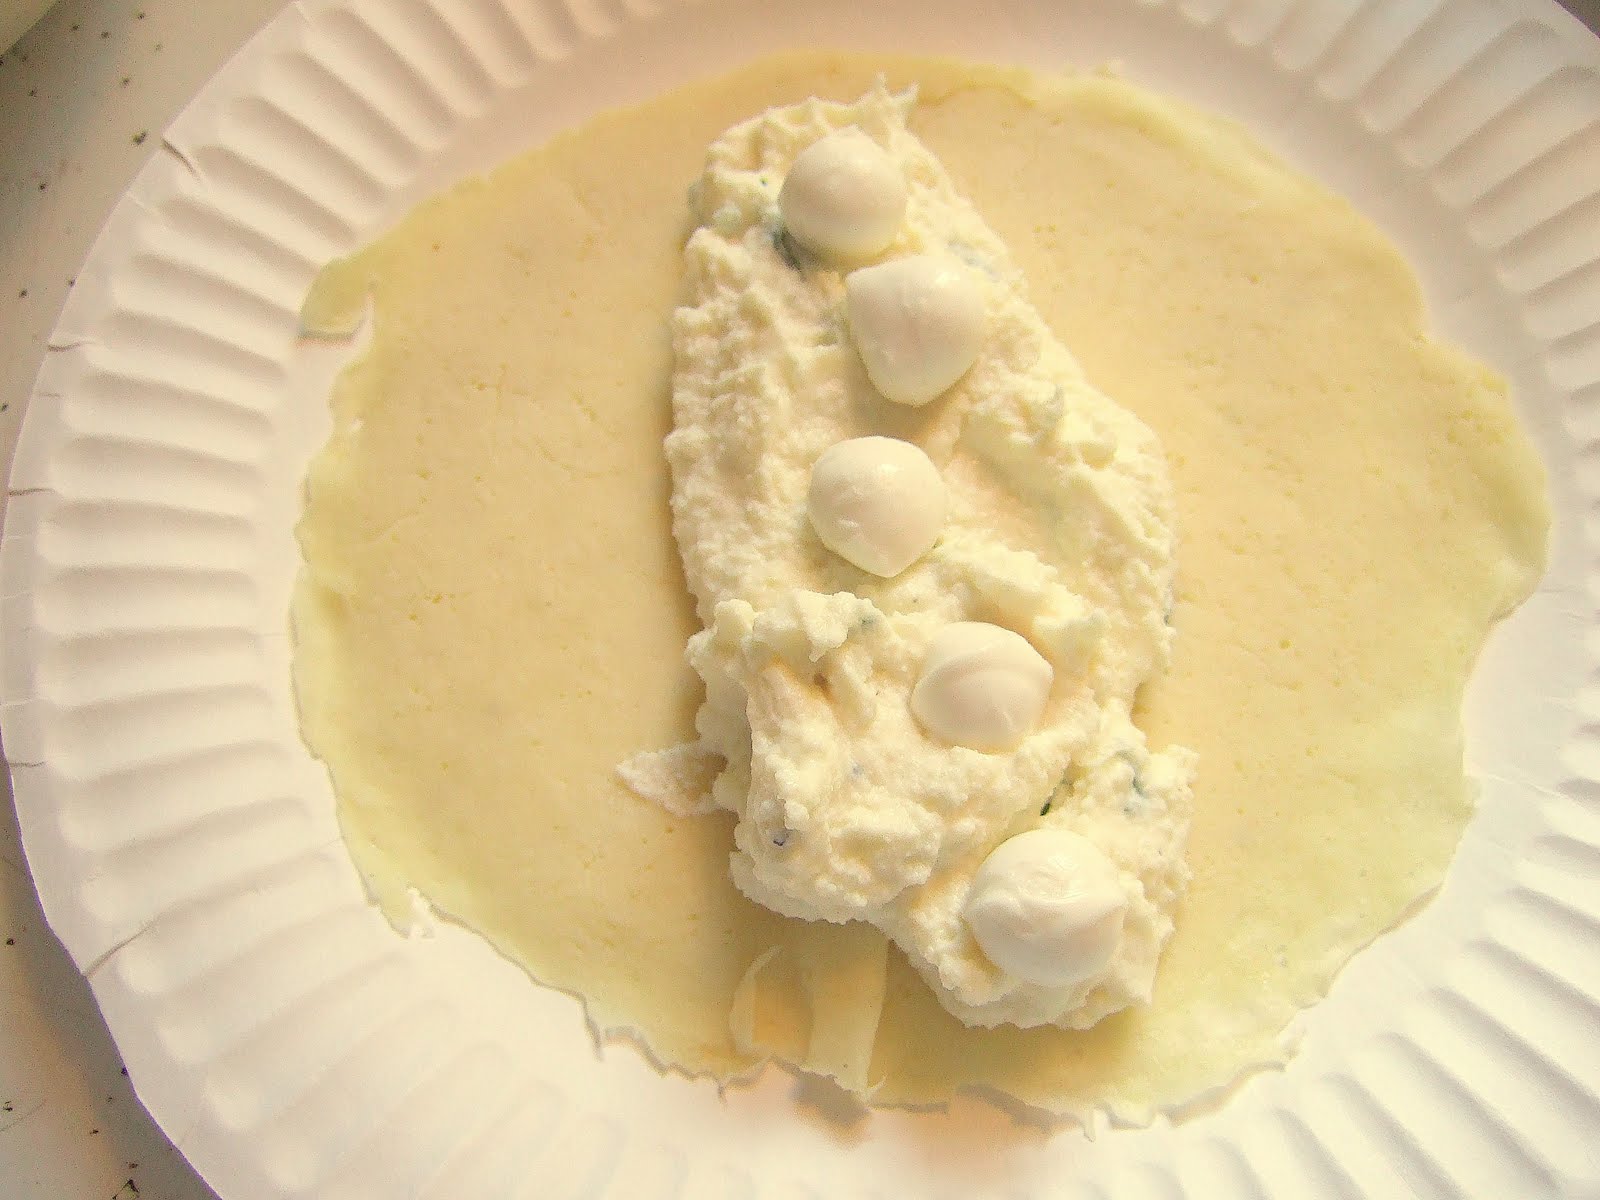
Spread 2 cups sauce in larger baking dish and 1 cup in smaller one. Arrange 1 crêpe, browned side up, on a work surface, then spread about 1/4 cup filling in a line across center and top with a mozzarella strip. Fold in sides to enclose filling, leaving ends open, and transfer, seam side down, to either baking dish. Fill 11 more crêpes in same manner, arranging snugly in 1 layer in both dishes (8 in larger dish and 4 in smaller).
Spread 1 cup sauce over cannelloni in larger dish and 1/2 cup in smaller dish. Tightly cover dishes with foil and bake until sauce is bubbling and filling is hot, 15 to 20 minutes. Serve remaining sauce on the side.
 
Cannelloni can be assembled (but not baked) 1 day ahead and chilled, covered with foil. Chill remaining sauce, covered, separately. Let stand at room temperature 15 minutes before baking, covered with foil. Reheat sauce, thinning slightly with water.