Here is a divine recipe for that special occasion when you have a lot of time for cooking and you want to make an impressive, delicious dish for a crowd. The beauty of this recipe is that all of the components can be made in advance, the dish can even be assembled the day before one's dinner and the last minute kitchen preparation time is avoided.
If there is one thing I can't stand about entertaining, it's being stuck in the kitchen slaving over the oven while my guests are all having fun without me. I often look for recipes just like this one that can be done ahead of time when I am going to entertain a group. An unstressed hostess is a good hostess!
This is such a sublime dish. The crepe "noodles" are the most delicate of creations. I suppose those no-bake lasagna noodles could be cooked up in a pinch and used as a substitute but oh, they just wouldn't have the consistency that these had. It's a great recipe for the vegetarians in the crowd too. Be sure and let this sit after taking out of the oven for at least 15 minutes before cutting into it so the cheeses congeal a little bit before serving.
Homemade Cannelloni
For sauce
3 tablespoons olive oil
1 medium onion, chopped
3 garlic cloves, minced
2 (28- to 32-oz) cans Italian tomatoes in juice, drained, reserving juice, and finely chopped
1/2 cup water
1 teaspoon sugar
1 teaspoon salt
1/4 cup chopped fresh basil
For crêpes
3 large eggs
1 1/2 cups water
1 1/4 cups all-purpose flour
1/2 teaspoon salt
1 tablespoon unsalted butter, melted
For filling
2 lb fresh ricotta (3 cups)
2 large eggs
1 oz finely grated Parmigiano-Reggiano (1/2 cup)
1/3 cup chopped fresh parsley
1/2 teaspoon salt
1/2 teaspoon black pepper
1/2 lb fresh mozzarella (I used small, fresh mozzarella balls)
Special equipment: 2 glass or ceramic baking dishes, one 13 by 9 inches and one 8 inches square
Make sauce:
Heat oil in a 5- to 6-quart heavy pot over moderately high heat until hot but not smoking, then sauté onion, stirring occasionally, until golden, about 6 minutes. Add garlic and sauté, stirring, until golden, about 1 minute. Add tomatoes with juice, water, sugar, and salt and simmer, uncovered, stirring occasionally, until thickened, about 30 minutes. Stir in basil and remove from heat.
Make crêpes:
Break up eggs with a wooden spoon in a medium bowl and stir in water until combined (don't beat). Sift in flour and salt, then stir batter until just combined. Force through a medium-mesh sieve into another bowl.
Lightly brush an 8-inch nonstick skillet with melted butter and heat over moderate heat until hot. Ladle about 1/4 cup batter into skillet, tilting and rotating skillet to coat bottom, then pour excess batter back into bowl. (If batter sets before skillet is coated, reduce heat slightly for next crêpe.) Cook until underside is just set and lightly browned, about 30 seconds, then invert crêpe onto a clean kitchen towel to cool completely. Make at least 11 more crêpes in same manner, brushing skillet with butter as needed and stacking crêpes in 3 piles.
Make filling and assemble cannelloni:
Stir together ricotta, eggs, Parmigiano-Reggiano, parsley, salt, and pepper.
Put oven rack in middle position and preheat oven to 425°F.
Cut mozzarella lengthwise into 1/4-inch-thick sticks.
Spread 2 cups sauce in larger baking dish and 1 cup in smaller one. Arrange 1 crêpe, browned side up, on a work surface, then spread about 1/4 cup filling in a line across center and top with a mozzarella strip. Fold in sides to enclose filling, leaving ends open, and transfer, seam side down, to either baking dish. Fill 11 more crêpes in same manner, arranging snugly in 1 layer in both dishes (8 in larger dish and 4 in smaller).
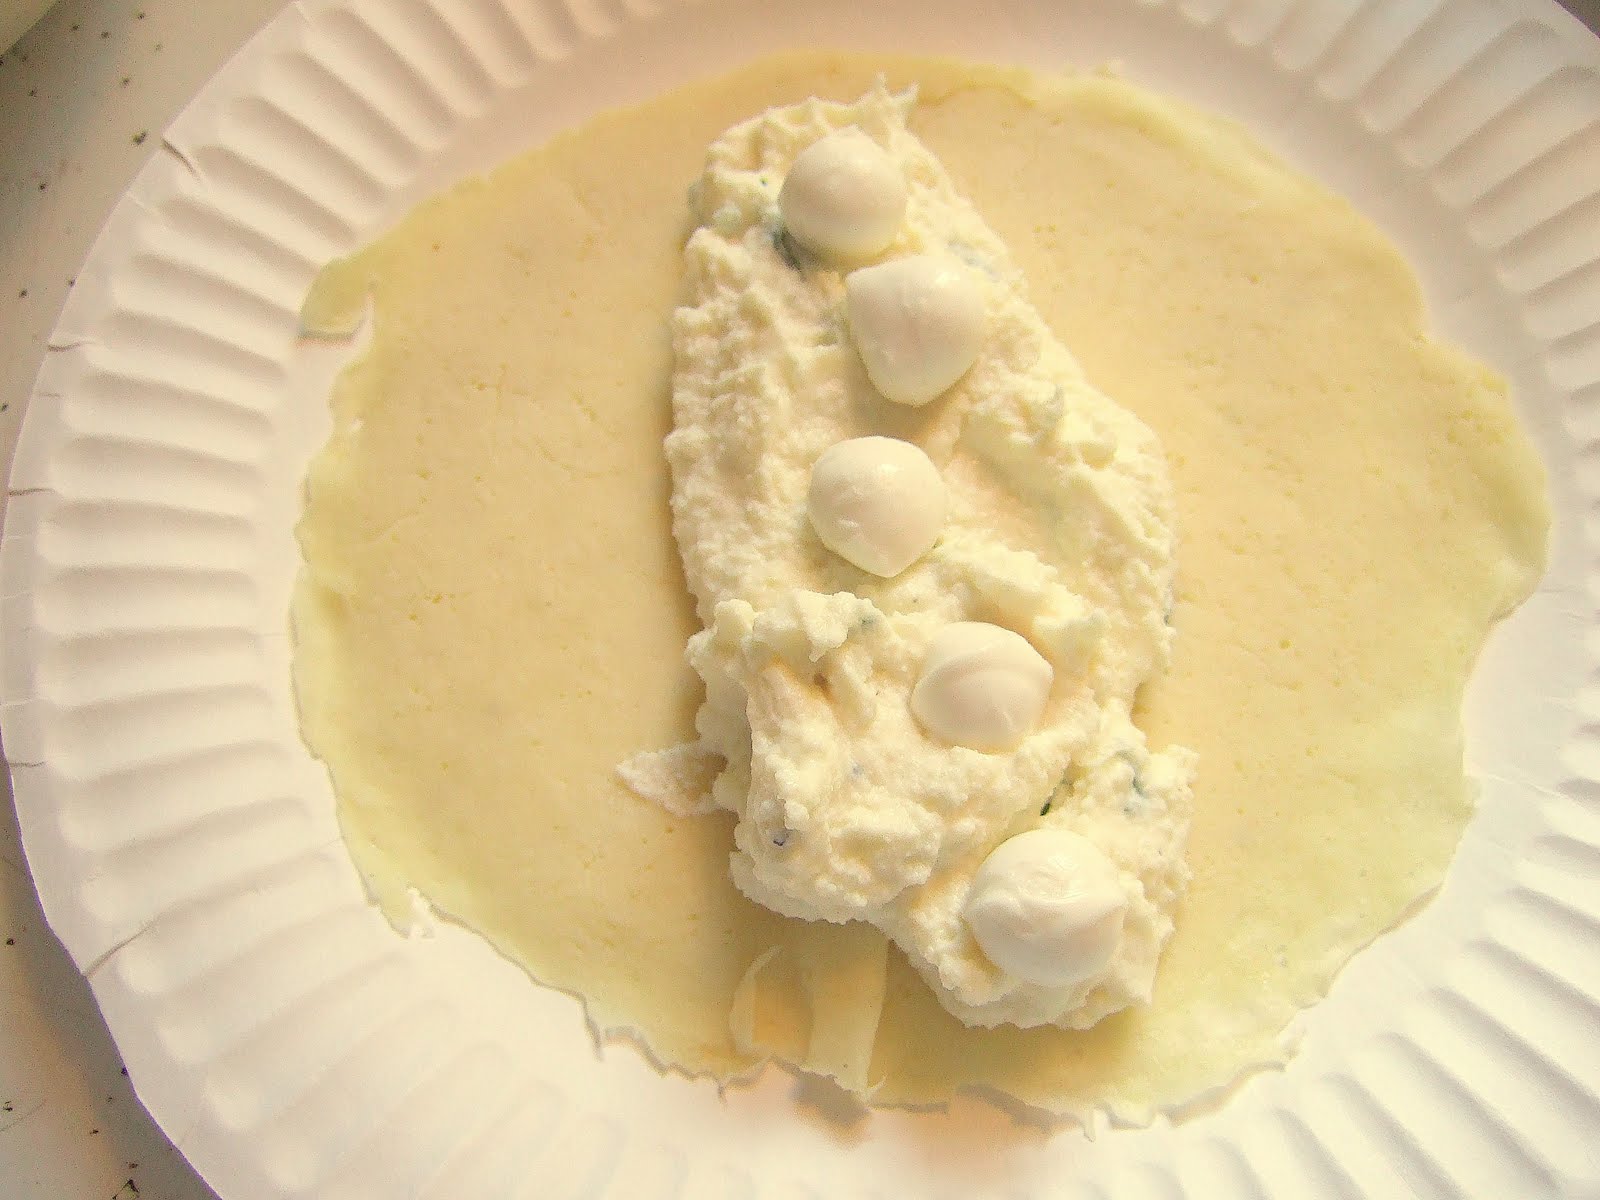
Spread 1 cup sauce over cannelloni in larger dish and 1/2 cup in smaller dish. Tightly cover dishes with foil and bake until sauce is bubbling and filling is hot, 15 to 20 minutes. Serve remaining sauce on the side.
Cannelloni can be assembled (but not baked) 1 day ahead and chilled, covered with foil. Chill remaining sauce, covered, separately. Let stand at room temperature 15 minutes before baking, covered with foil. Reheat sauce, thinning slightly with water.
Showing posts with label Italian. Show all posts
Wednesday, September 29, 2010
Sunday, October 12, 2008
Cherry-Poppin' Tomato Sauce
The Husband tore down the garden on this gorgeous Fall day and there was still an amazing quantity of produce left on the vines to deal with. The corn on the cob was blanched, thrown in ice water for a few minutes, wrapped individually in plastic wrap and then put in freezer bags for the deep freeze. These lovely ears will be enjoyed in the dead of winter and we will remember our bountiful garden in the summer of 2008.
Above: Corn fresh from the garden.
Above: Corn in their blanching bath
Above: All wrapped up and ready for the freezerAs for the many cherry tomatoes, I opted to roast those and they too will be frozen and enjoyed later in the year when we are facing day after day of gloomy weather and there won't be a decent tomato anywhere to be found. I wish I had smell-o-computer so you could all enjoy the aromas in my house right now. The garlic and spices have permeated every corner of every room and it's divine. This sauce will be so delicious mixed with a delicate angel hair pasta, a few sprigs of fresh basil and some generous shavings of Parmesan cheese. We might not be able to wait until winter to devour this creation!
Cherry-Poppin' Tomato Sauce5 cups cherry tomatoes
4 cloves finely minced garlic
4 Tbsp. olive oil
salt and pepper to taste
Italian Seasoning to taste
Chili Pepper flakes to taste
Preheat oven to 400 degrees. Wash and take stems off cherry tomatoes. Put in single layer in a baking dish. Sprinkle with salt, pepper, Italian Seasoning, chili pepper flakes and minced garlic. Pour olive oil over all of the tomatoes and gently toss with a spatula.
Bake in oven for 45 minutes. Let cool completely. Put in freezer bags or eat immediately as a sauce with pasta. This would also be good over toasted Italian or French bread slices.Wednesday, October 8, 2008
The Alchemy of Cooking
I love the magic of cooking. I love how you can take the most simple of ingredients; a sprinkle of yeast, a bit of sugar, a few cups of flour, mix it together, let it sit for a couple hours and voila - a beautiful bread dough I made pizza dough with a delicious recipe that I've had around for awhile. It is very simple to make and very easy to work with once it's risen. Pizza is a great thing to try at home as there are endless possibilities for toppings. I like to divide the pizza into two parts; one with a meat choice and one vegetarian side. Tonight's pizza included tomato sauce, mozzarella and Parmesan cheese topped with a dry salami on one side and garlic olive oil, mozzarella, Parmesan and a sprinkling of fresh basil on the other side.
Really, homemade pizza is a fairly quick dinner once you have finished the dough and it has risen to all of it's glory. Just spread or roll the dough out onto your pan, slap on the toppings, pop it into the oven for 15-20 minutes and there you have it.
Pizza Dough
1 Tbsp dry active yeast (1 envelope - I use fast acting)
1 1/4 cup warm water (under 110deg F)
1/4 tsp sugar
2 Tbsp olive plus a little extra for greasing the pan
1/4 cup grated Parmesan cheese
3 cups all purpose flour
1 tsp salt
Place the yeast, 1/4 cup of warm water and sugar into mixing bowl. Stir and set aside until the yeast foams, about 10 minutes.
From This - a few ingredients - yeast, water, sugar.Add the remaining water, olive oil and cheese. Using the dough hook of your electric mixer, mix on low speed just to blend. Still on low speed, add the flour one sixth at a time. Add the salt and continue mixing until the dough is smooth and elastic, about 3-4 minutes. While the dough is mixing, flour your work surface and grease a large mixing bowl with some oil.
Remove the dough to the floured work surface and knead for a minute or two to form a smooth ball. Place the dough in the greased bowl, cover with a towel or plastic wrap and set aside in a warm place until it has doubled in bulk, about 1 1/2 hours.
To This - a lovely, soft malleable dough. It's magic!Once the dough has doubled in bulk, turn it out onto a floured work surface, roll it or stretch it with your hands into a circle or square until the dough is approximately 1/4 inch thick. Place dough onto a greased baking sheet that has been dusted with cornmeal (I omitted this step and it came off the pan just fine).
The Pizza ready for the oven.Distribute your topping choices over the pizza dough and set the baking sheet in the top third of the oven which has been set to 450 degrees. Bake until the crust is golden brown the the cheese is bubbling, approximately 15-20 minutes. Enjoy a wonderful, flavorful pizza!

Sunday, October 5, 2008
Lemon Shrimp Linguine
Last night's dinner along with the previously posted Risotto filled baked tomatoes included a lemon shrimp linguine dish which was fast, easy and very flavorful. I adapted this recipe from one I saw on an Ina Garten episode on Food Network. To make things quicker, I purchased cooked, peeled and deveined prawns. There are times when I don't mind making the effort and doing all that prep work but we have a wonderful fish store in town, Fitts Seafood, who will do all of that for you (for a price of course).If you are looking for a quick dinner involving pasta and prawns, this one fits the bill.

3/4 lb linguine (fettuccine or spaghetti noodles would also work)
3 Tbsp butter
3 Tbsp olive oil
2 cloves garlic, minced (more garlic to taste)
1 pound of large shrimp/prawns -peeled and deveined if purchased raw
1/4 tsp ground black pepper
1/3 cup fresh parsley leaves, finely chopped
1/4 cup fresh squeezed lemon juice
Zest of 1/2 lemon
salt to taste
1/8 tsp hot red pepper flakes (or more to taste)
Heat a big pot of water with 2 Tbsp salt for linguine. Once boiling add noodles and cook until done according to package directions.
Heat butter and olive oil together in a skillet. Add minced garlic and saute just until you can start to smell garlic. Add the salt, pepper, shrimp and saute until shrimp just turn pink. If shrimp are already cooked, just heat through. Remove from heat and add parsley, lemon zest, lemon juice and red pepper flakes. Drain pasta and put back in pan. Pour sauce and shrimp over pasta and toss well. Serve immediately.
Saturday, October 4, 2008
Big Boys
The Big Boy tomatoes are finally ripening and we must get them picked soon as the rains have begun and Fall is definitely in the air. I picked a dozen or so of these big red beauties today and shared some of the harvest with the nice neighbor lady next door along with some basil. With the rest I decided to try my hand at a stuffed tomato to go along with tonight's pasta dinner. I recently read this recipe and thought it sounded interesting and the nice thing was that I had all of the ingredients in my cupboards so didn't need to make a trip out for anything. It was extremely easy to put together and as it was cooking for 75 minutes, the house was filled with the perfume of garlic and onions. After cooking, they weren't the most attractive dish I've ever seen, but they are extremely flavorful and a great way to use ripe, big tomatoes from your garden or the farmers market. Give it a try.
Risotto Filled Baked Tomatoes4 large tomatoes
1/2 cup yellow onions finely diced
1 finely minced garlic clove
Olive oil (Approximately 3 Tbsp)
1/2 cup Arborio rice
1/3 cup water
5 fresh basil leaves
salt
Seasoned bread crumbs
2 Tbsp finely grated Parmesan cheese
2 medium Yukon gold potatoes, sliced into 1/4 inch thick rounds
Preheat the oven to 350 degrees.
Cut the tops off of the tomatoes and gently scoop out their insides, flesh, seeds and juice and put in a bowl. Chop up any of the bigger tomato flesh. Set the hollowed out tomatoes into a lightly greased baking dish.
In a medium saucepan over medium heat, warm up 2 Tbsp olive oil. Add the onions and cook until translucent. Add the garlic and saute a few seconds until you can smell it. Add the rice and saute for 2 minutes. Add the tomato juice, flesh and water and the basil leaves torn into small pieces and a pinch of salt. Stir. Reduce the heat slightly, cover the pot and simmer for 10 minutes.
Spoon the rice mixture into the tomato shells. Top with a generous sprinkling of breadcrumbs and Parmesan cheese which have been mixed together. Arrange the potato slices around the tomatoes. Sprinkle everything with olive oil, making sure the potatoes are well coated on both sides. Bake for 1 hour and 15 minutes. Cook for 15 minutes to allow the juices to settle then serve.
Sunday, September 14, 2008
Dried Cherry Biscotti
It's been a baking kind of weekend. Cookies and cake. Cookies for The Husband and cake for a last of the summer Bar-B-Que at the Mother-in-Law's. I'll start with the cookie recipe and talk about the cake in another entry. A favorite in our house is cherries. Cherry jam, cherry pie, cherry turnovers, plain cherries and dried cherry biscotti (I sound like Forrest Gump - fried shrimp, boiled shrimp, etc.....).This recipe makes very good biscotti and they are fairly easy to make but are messy as I have found that when mixing the ingredients together it is far more effective to use one's hands then a spoon. They also take some tending to when baking them as they are twice baked and have to be cooled a bit after the initial baking and then cut, and then baked again in two 5 minute sessions. The end result is worth it though. They turn out crunchy, not too sweet and with nice sour bites with the dried cherries.
Dried Cherry Biscotti
2 1/2 cups all purpose flour
1 cup sugar
1/2 tsp baking soda
1/2 tsp baking powder
1/2 tsp salt
3 large eggs
1 tsp vanilla extract
2/3 cup chopped dried cherries (dried cranberries also work)
1 cup ground almonds
Sugar for the top (optional)
Lightly grease one cookie sheet. Preheat oven to 35o degrees.Blend flour, sugar, baking soda, baking powder and salt in a large bowl. Add eggs and vanilla, beating until dough is formed. Stir in almonds and cherries.
Turn dough out onto lightly floured surface and kneed several times. Using the greased cookie sheet as a surface, divide the dough in half and form into two flat logs about 9 inches long by 3 inches wide. I like to press some sugar onto the tops for an added sweet crunch.Bake for 25 minutes or until lightly browned on top. 
Let cool directly on baking sheet resting on a rack for 10 minutes.
Lower heat to 325 degrees. On a cutting board, cut the logs on the diagonal into 1/2 inch thick pieces. Put back in oven for 5 minutes. Turn over and bake 5 more minutes. Remove from cookie sheet and cool on a baking rack. Store in an airtight container.
Sunday, September 7, 2008
Cheesy Pesto Lasagna
I made a totally lazy version of lasagna using prepared tomato sauce and fresh lasagna sheets and it turned out quite well. Here is what made it a step above Costco's frozen lasagna (which isn't half bad). I mixed some of my homemade pesto in with the ricotta cheese and it really gave it a great basil/garlic taste. I also used some Paul Newman's Marinara Sauce and it too was fairly tasty. Putting together the whole thing couldn't have been easier.This size lasagna would easily serve a family of four as opposed to how I usually make my lasagnas; big enough to feed a small army. Sometimes I forget that I am only cooking for two and I overdo it on size. Leftovers are great but not for 5 days in a row!
Cheesy Pesto Lasagna4 sheets of fresh lasagna sheets
1 16 oz jar of marinara sauce
1 cup of pesto
1 1/2 cups of ricotta
1 cup of grated Parmesan cheese
2 cups of grated mozzarella cheese
Grease an 8 inch square baking pan. Mix ricotta cheese and pesto together until blended. Pour enough marinara sauce over the bottom of pan to cover. Place lasagna sheet over sauce. Cover sheet with ricotta/pesto mixture, dollop marina sauce over ricotta then sprinkle with both mozzarella and Parmesan cheeses. Continue layering in this manner ending with pasta covered with marinara sauce and mozzarella and Parmesan cheeses.
Cover with foil and bake at 350 degrees for approximately 45 minutes. Remove foil and place under broiler until cheeses are brown and bubbly. Watch carefully as cheeses can burn quickly. Let sit for 15 minutes before cutting to ensure everything holds together nicely.
Sunday, August 24, 2008
A Super Garage Sale Buy
Sometime in the last 18 years since I moved to Salem, I purchased an Italian Atlas hand crank pasta maker for the phenomenal price of $5.00. Currently they range in price from $40-$100 according to my Internet search today. At the time I made this bargain buy, I had never even attempted making homemade pasta. I bought it on an impulse and thought it was something I couldn't pass up. I have used it many times since.
I have made linguini, spaghetti and lasagna noodles but something I have never attempted is ravioli and today was the day for that culinary challenge. It was certainly time consuming but a very satisfying experience.
I started by making the pasta dough which consisted of 2 cups of flour and 3 eggs processed in the food processor until it came together in a ball. It rested for a few minutes after kneading until smooth. I then made the filling. The filling consisted of 1 cup of ricotta cheese, 2 eggs, salt and pepper to taste, 2 tablespoons of tomato puree and 2 tablespoons julienned fresh basil thoroughly mixed together.
Once the filling was done, I rolled out the pasta sheets and set them on flour covered towels. I then took one sheet, placed it on my flour covered granite counter, put a teaspoon of filling approximately 1 1/2 inches apart, painted the dough sides and in between the filling with water than placed a second sheet on top. I pushed around the filling gently with my fingers to get out any air bubbles then around the sides to seal the two pieces of dough together.
I tried at first to cut the ravioli with a biscuit cutter but I found it cut too close to the filling so I opted to use a knife to trim around the excess dough and then cut each ravioli to the size of approximately 2 inches by 2 inches. These precious pillows were then placed on a flour covered towel on a cookie sheet where they rested in the refrigerator until time to cook. They cooked in gently simmering water for approximately 10 minutes.To dress the ravioli I made a tomato alfredo sauce consisting of heavy cream gently boiled until it coated the back of a spoon, added a couple of tablespoons of butter, a tablespoon of tomato puree and approximately 1/2 cup of shredded parmesan cheese.
My assessment of this dish was just so-so. The ravioli filling was rather bland and there was just too much dough around the filling. From now on I will leave the stuffed pasta making to the pros. The sauce was pretty good though. You can't go wrong with cream, butter and parmesan cheese, now can you?
Monday, July 21, 2008
Salad Caprese
Last night I wasn't feeling very inspired to cook as I had taken on the challenge of cleaning out my spice and baking cabinets yesterday. Some of the spices and herbs I found in the bowels of that cabinet have probably moved with me since I came to Salem in 1990 from Seattle. Needless to say it was a jumbled, unorganized mess. Below is a pic of the mishmash I took out:
While I was at it I thought I might as well go for it and clean out the entire space. My friend Janet would be proud of me. She was (and probably still is) one of the neatest people I ever knew and her apartment always looked spotless. I took a trip to the local Bed, Bath, and Beyond and purchased functional clear glass jars for individual spices, labels, and a Lazy Susan (what an apropos name for that gadget). I then went next door to the World Market where I found a large selection of spices and herbs in manageable quantities for .99 cents each. Eureka!An hour later after pouring the spices into their cute little jars and labeling them I felt such a sense of satisfaction. As well, the room and my hands were very fragrant with the heady smells of the spices. It smelled like walking into an Indian spice store. Below is a pic of the final results:
So, back to my original statement above, I whipped together some spaghetti with meat sauce and to accompany this Italian dinner we had Salad Caprese made with slices of vine ripe tomatoes (from the store, not our garden!), basil (from our garden) and slices of fresh whole milk mozzarella balls. The salad was dressed with salt, pepper and drizzles of extra virgin olive oil and balsamic vinegar. Truly a masterful summer salad!
Subscribe to:
Posts (Atom)


